Archive | Mac RSS feed for this section

running redis as daemon on osx

10 Sep
sudo vim /Library/LaunchDaemons/io.redis.redis-server.plist

Paste in the following contents and modify it to point it to wherever you’ve got redis-server installed and optionally pass the location of a config file to it (delete the redis.conf line if you’re not using one):

<?xml version="1.0" encoding="UTF-8"?>
<!DOCTYPE plist PUBLIC "-//Apple//DTD PLIST 1.0//EN" "http://www.apple.com/DTDs/PropertyList-1.0.dtd">
<plist version="1.0">
<dict>
    <key>Label</key>
    <string>io.redis.redis-server</string>
    <key>ProgramArguments</key>
    <array>
        <string>/usr/local/bin/redis-server</string>
        <string>/usr/local/etc/redis.conf</string>
    </array>
    <key>RunAtLoad</key>
    <true/>
</dict>
</plist>

Make sure that you actually have a redis.conf file at the location above. If you’ve installed it with homebrew that should be the correct location.

You’ll then need to load the file (one time) into launchd with launchctl:

sudo launchctl load /Library/LaunchDaemons/io.redis.redis-server.plist

Redis will now automatically be started after every boot. You can manually start it without rebooting with:

sudo launchctl start io.redis.redis-server

You can also shut down the server with

sudo launchctl stop io.redis.redis-server

Or you could add these aliases to your bash/zsh rc file:

  • alias redisstart=’sudo launchctl start io.redis.redis-server’
  • alias redisstop=’sudo launchctl stop io.redis.redis-server’

If you’re having some sort of error (or just want to watch the logs), you can just fire up Console.app to watch the redis logs to see what’s going on.

Installing Nginx on Mac using Brew

20 Feb

Install Using Brew . ( Don’t have brew ?? go Here )

  • Brew install nginx 
  • Nginx will be installed and started by brew itself
  • If not then type sudo nginx
  • Test nginx by opening this url in browser : – http://localhost:8080


Add to the PATH on Mac OS X

25 Jun
  • Open up Terminal.
  • Run the following command:
  • sudo vim /etc/paths
  • Enter your password, when prompted.
  • Go to the bottom of the file, and enter the path you wish to add.
  • Now type :wq to save the file

That’s it!  To test it, in new terminal window, type:

  • echo $PATH
  • Shobhit:~ apple$ echo $PATH
    /usr/bin:/bin:/usr/sbin:/sbin:/usr/local/bin:/usr/local/share/npm/bin

Change Username for Whole Mac

25 Jun

Sometimes you change the username in user and Account Settings and it still shows old username.so this is what you need to do

System Preferences->Sharing->Computer Name

OR

sudo hostname your_hostname

If that doesn’t work, try this:

sudo scutil --set HostName your_hostname

Installing Node.js

17 Jun

Installing Node.js via package manager

The packages on this page are maintained and supported by their respective packagers, not the node.js core team. Please report any issues you encounter to the package maintainer. If it turns out your issue is a bug in node.js itself, the maintainer will report the issue upstream.

Gentoo

Node.js is available in official gentoo portage tree. You have to unmask it.

# emerge -aqv --autounmask-write nodejs
# etc-update
# emerge -aqv nodejs

Debian, LMDE

Node.js is available in official repo for Debian Sid(unstable).

For Debian Wheezy, your best bet is to compile node by yourself:

sudo apt-get install python g++ make checkinstall
mkdir ~/src && cd $_
wget -N http://nodejs.org/dist/node-latest.tar.gz
tar xzvf node-latest.tar.gz && cd node-v*
./configure
checkinstall #(remove the "v" in front of the version number in the dialog)
sudo dpkg -i node_*

Uninstall:

sudo dpkg -r node

Ubuntu, Mint

Example install:

sudo apt-get update
sudo apt-get install python-software-properties python g++ make
sudo add-apt-repository ppa:chris-lea/node.js
sudo apt-get update
sudo apt-get install nodejs

It installs current stable Node on the current stable Ubuntu. Quantal (12.10) users may need to install the software-properties-commonpackage for the add-apt-repository command to work: sudo apt-get install software-properties-common

As of Node.js v0.10.0, the nodejs package from Chris Lea‘s repo includes both npm and nodejs-dev.

There is a naming conflict with the node package (Amateur Packet Radio Node Program), and the nodejs binary has been renamed fromnode to nodejs. You’ll need to symlink /usr/bin/node to /usr/bin/nodejs or you could uninstall the Amateur Packet Radio Node Program to avoid that conflict.

openSUSE & SLE

Node.js stable repos list. Also node.js is available in openSUSE:Factory repository.

Available RPM packages for: openSUSE 11.4, 12.1, Factory and Tumbleweed; SLE 11 (with SP1 and SP2 variations).

Example install on openSUSE 12.1:

sudo zypper ar http://download.opensuse.org/repositories/devel:/languages:/nodejs/openSUSE_12.1/ NodeJSBuildService 
sudo zypper in nodejs nodejs-devel

Fedora

Node.js and npm are available in Fedora 18 and later. Just use your favorite graphical package manager or run this on a terminal to install both npm and node:

sudo yum install npm

RHEL/CentOS/Scientific Linux 6

Node.js and npm are available from the Fedora Extra Packages for Enterprise Linux (EPEL) repository. If you haven’t already done so, first enable EPEL and then run the following command to install node and npm:

su -c 'yum install npm'

Arch Linux

Node.js is available in the Community Repository.

pacman -S nodejs

FreeBSD and OpenBSD

Node.js is available through the ports system.

/usr/ports/www/node

Development versions are also available using ports

cd /usr/ports/www/node-devel/ && make install clean

or packages on FreeBSD

pkg_add -r node-devel

OSX

Using a package

Simply download Macintosh Installer.

Using homebrew:

brew install node

Using macports:

port install nodejs  

Windows

Using a package

Simply download Windows Installer.

Using chocolatey to install Node:

cinst nodejs  

or for full install with NPM:

cinst nodejs.install

Configure OpenVPN on PC

14 Jun

For Windows:

  1. Download this File from here and Install it on Windows

  2. Now it will ask for .ovpn files in Documents Diretory

  3. Provide the ovpn file and Save the settings

  4. An icon should appear on the Openvpn Utility. 

  5. Click on that Icon. Enter the username and password.

For Linux:

     To connect to Access Server from a Linux client computer, you need to follow these steps:

  1. Install an OpenVPN client for Linux

  2. Login to the Access Server’s Client Web Server and download the desired client config file (typically called “client.ovpn”

  3. Run the OpenVPN client with the downloaded client config file

     INSTALLING AN OPENVPN CLIENT:

      Usually, the easiest way to install an OpenVPN client is to use the package management system for your particular   Linux distribution.  Run one of the following commands (as root):

     Fedora/CentOS/RedHat:

  1. yum install openvpn

  2. *NOTE: OpenVPN Access Server is not compatible with any version below the 2.1 OpenVPN Community/Linux client!

     Ubuntu/Debian:

  1. apt-get install openvpn

  2. Once the openvpn package is fetched from the Internet and installed, run the client with the –version argument to make sure that it is version 2.1:

  3. openvpn –version

    RUNNING THE OPENVPN CLIENT WITH THE DOWNLOADED CLIENT CONFIG FILE:

    Usually, the easiest way to install an OpenVPN client is to use the –config argument to specify the location of the downloaded client config file:

    openvpn –config client.ovpn

MAC :-


Installing Tunnelblick

The Tunnelblick application contains the Tunnelblick GUI, OpenVPN, and OpenSSL, so no other installations are needed.

Special note for those who may have installed RaptorVPN or Urban Shield VPN, VPN In China, or certain other VPN software: These installations have backups that must be removed before installing or reinstalling Tunnelblick unless you are continuing to use the same service.Uninstalling Tunnelblick will remove these backups. See this Discussion Group thread for details.

First, download the latest disk image from the Downloads page. Double-click the downloaded .dmg file. An icon for a “Tunnelblick” disk will appear on the Desktop, and a window similar to the following will appear:

Double-click the Tunnelblick icon and a new window will appear, similar to the following:

Click the “Open” button to continue and a new window will appear, similar to the following:

If you are reinstalling, upgrading, or downgrading Tunnelblick, the window will show the version number of the current copy and of the new copy. The current copy of Tunnelblick will be put in the Trash before it is replaced.

The name and password of a computer administrator is needed to install Tunnelblick. Tunnelblick’s imbedded OpenVPN needs root privileges because it needs to modify network settings by configuring new network devices, changing routes, and adding and removing nameservers. Because we don’t want you to enter your administrator account name and password every time you start a VPN connection, Tunnelblick comes with a setuid root binary that allows it to start a VPN connection with super user rights. Tunnelblick uses your administrator account name and password so it can create this setuid root binary. Tunnelblick also secures itself from being modified.

Click the “Install” button to copy Tunnelblick to your hard drive at the indicated location.

Once that is done (it may take a couple of seconds), a new window will appear, similar to the following:

Click the “Launch” button to launch Tunnelblick

If Tunnelblick is currently running, a window similar to the following will appear:

(Note: Connections marked “automatically start when computer starts” will not be closed.)

Click the “Close VPN Connections and Stop Tunnelblick” to continue. After all connections are closed and Tunnelblick has quit, the new version of Tunnelblick will be launched. Continue with the following sections.

AnchorThe First Time Tunnelblick is Run by Each User

If this is the first time you have run Tunnelblick as a particular user, or the first time after certain Tunnelblick upgrades, the following window will appear:

Specify whether or not you wish to have Tunnelblick check for updates each time it is launched. Each time an update is available, you will be given a choice of whether to install the update or not.

When there are no configurations (which is usually the case the first time Tunnelblick is run by each user when using a non-deployed version of Tunnelblick with no Shared configurations), the configuration helper will appear:

Click the appropriate button and the configuration helper will guide you through the installation of configuration files.

AnchorLaunching Tunnelblick

To launch Tunnelblick after setting up configuration and other files, double-click “Launch Tunnelblick” in the Configurations folder, or double-click Tunnelblick in the Applications folder (or wherever else you installed it).

If Tunnelblick is running when you log out, shut down, or restart your computer, it will automatically be launched when you log in.

AnchorUninstalling Tunnelblick

If you intend to re-install Tunnelblick, be sure you have a backup of your Tunnelblick configuration files and key and certificate files — the .ovpn, .key, .crt, and/or .tblk files, and make a note of any configuration settings and appearance and other preferences you have set up. (They will be lost.)

Download the latest uninstaller disk image from the Downloads page and double-click it. (The uninstall program may be used to uninstall any version of Tunnelblick or any version of any rebranded version of Tunnelblick.)

The uninstall program can do a “test”, which does not uninstall anything, but displays a log of what it would have done if it were uninstalling.

To uninstall Tunnelblick located in /Applications:

  • Quit Tunnelblick*
  • Double-click the “Uninstaller”
  • Click on “Test” or “Uninstall”


To uninstall Tunnelblick, RaptorVPN, Urban Shield VPN, or other rebranded Tunnelblick:

  • Quit Tunnelblick (or the rebranded program)*
  • Drag and drop the “Uninstaller” to your Desktop
  • Drag and drop the application you want to uninstall (Tunnelblick or a rebranded program) to the “Uninstaller” on your Desktop
  • Click on “Test” or “Uninstall”


* If you get a “spinning beachball” when you click the Tunnelblick icon, that usually means that Tunnelblick has a window open and is waiting for your response. Minimize or close the windows of all other applications (and in all Spaces) to expose the window. If Tunnelblick does not have an open window, you will have to force Tunnelblick to quit. Follow the procedure described in this discussion in the Tunnelblick Discussion Group.


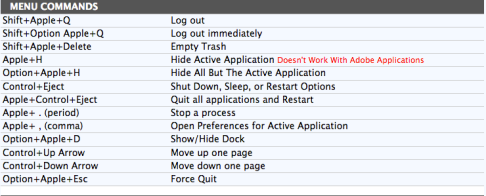
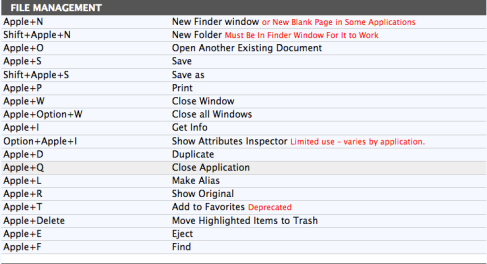
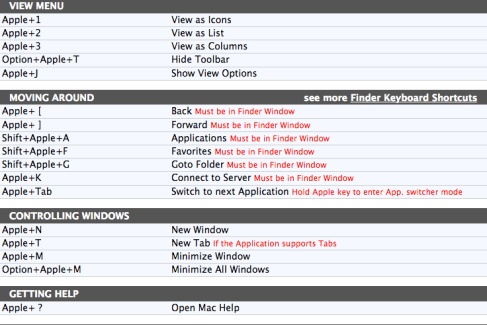
Apple Mac Keyboard Shortcuts

11 Jun

ImageImageImageImageImagert

Lock a Mac Screen

8 Jun

The fastest and easiest way to lock the screen in Mac OS X is with a simple keyboard shortcut:

  • Control+Shift+Eject is the keystroke for Macs with an Eject key
  • Control+Shift+Power is the keystroke for Macs without the eject key, like the MacBook Air


Enable the Lock Screen in Mac OS X

This will cause the above keyboard shortcuts to lock the screen with a password:

  • Launch System Preferences
  • Click on “Security & Privacy” and look under the “General” tab
  • Click the checkbox next to “Require password after sleep or screen saver begins” – select either immediately or 5 seconds as the time interval
  • Exit out of System PreferencesImage


Watching 3D movies on Mac (Side by Side videos)

6 Jun

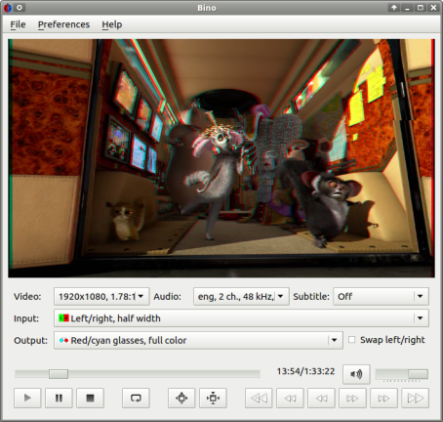
I was trying to figure out the proper method to see the 3D videos on mac.I have lots of Side by Side videos and i wanted to watch all those 3D movies so i figured out the Player and the exact Configuration to watch those movies

Image

First of all you have to download 3D player BINO from here

Open your 3D movie with player and Set this Configuration

Image


Now you need a red/cyan glass and just start watching movie on any computer

Mac Screen-capture with Mouse Pointer

3 Jun

Hi,

It is not easy on mac to take screenshots along with mouse pointers 

Direct screenshots can be taken through Command ⌘ + Shift + 4 (for Selected Areas)

For Screenshots with Mouse pointers :-

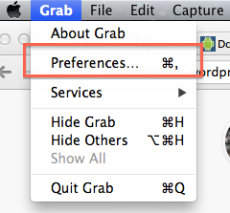
1) Go to finder and type Grab (Builtin Utility in Mac)

2) Go to preferences 

Image

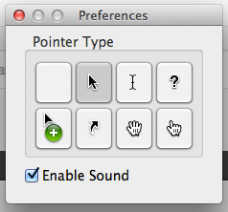
3) Select Any pointer you need 

Image


4) Now go to the page of which you want to take the screenshot 

5) Click Capture > Timed Screen

Image


6) Place the cursor on the item you want to take the screenshot and wait for 10 Seconds